

The impact of your Reolink camera not recording to the cloud can be significant. You risk missing out on vital moments, whether it’s a potential security threat, a doorstep delivery, or simply a glimpse of your pets. It’s frustrating, inconvenient, and can leave you feeling vulnerable.
But fret not! This article contains many solutions to resolve this issue. We’ve prepared seven simple tips to help you restore your camera’s cloud recording functionality.
By the time you’ve finished reading, you’ll be armed with the knowledge and solutions needed to keep your Reolink security camera cloud recording performing at its best.
So let’s dive in and discover the simple yet effective fixes that will have your Reolink camera recording to the cloud flawlessly once again.
Sommaire
What Can I Do to Fix the Reolink Camera Not Recording To Cloud?
Before we dive into the solutions, it’s important to highlight the key factors that can cause your Reolink camera to stop recording to the cloud.
These factors include a poor internet connection, an expired cloud subscription, low battery levels, extreme ambient temperatures, a disabled PIR sensor, or outdated camera firmware.
Understanding these potential causes will help you diagnose and resolve the issue effectively. Let’s now explore each of these factors in detail to find the right solutions.
Solution 1: Check Your Internet Connection.
When you first notice that your Reolink camera is not recording to the cloud, the very first step to take is to examine your internet connection.
This is a fundamental aspect that can directly impact your camera’s ability to transmit data to the cloud seamlessly.
Begin by verifying the status of your internet subscription. Ensure that it’s active and not expired, as an outdated subscription can disrupt the connection between your camera and the cloud.
Next, check for any potential connectivity issues that might be interrupting your camera’s connection. To fix major connectivity issues you can try the following:
- Power cycle your router.
- Reduce Wi-Fi frequency interference and connect the camera to 2.4GHz channel.
- Improve Wi-Fi signals.
- Make sure your smartphone or Wi-Fi is On.
- Reset the router.
- Make sure you’re using the right Wi-Fi credentials.
By addressing your internet connection as the initial step, you lay a strong foundation for ensuring your Reolink camera’s smooth cloud recording functionality.
Solution 2: Renew Your Cloud Subscription.
Another crucial step in addressing the issue of your Reolink camera not recording to the cloud is to check the status of your cloud subscription. An expired subscription can be a common reason for disruptions in your camera’s cloud recording feature.
To address this issue, it is essential to ensure that your cloud subscription is active and up to date.
Renewing your subscription ensures that your camera continues to benefit from cloud storage, giving you the peace of mind that your valuable footage will be securely stored in the cloud.
Solution 3: Recharge Your Camera’s Battery.
When addressing the recording issue with your Reolink camera, another essential aspect to consider is the camera’s battery level.
If you find that the battery level is running too low, make sure to recharge it.
Simply connect your camera to a power source using the provided charging cable and adapter. Allow it to charge for the recommended duration to ensure it attains an adequate battery level.
Please take note: If you have a model that works with a replaceable battery and you notice that it’s not charging, it might be time to consider replacing the battery.
Solution 4: Check The Ambient Temperature.
Another factor that can significantly influence your Reolink camera’s performance and potentially disrupt your cloud recording is the ambient temperature. It’s essential to be mindful of the operating environment in which your camera is placed.
Reolink cameras are designed to function within a specific temperature range, typically between -10°C to +55°C (14°F to 131°F). If the ambient temperature exceeds these limits, it can lead to malfunctions and hinder the camera’s performance.
To address this issue, ensure that your camera is operating within the recommended temperature range.
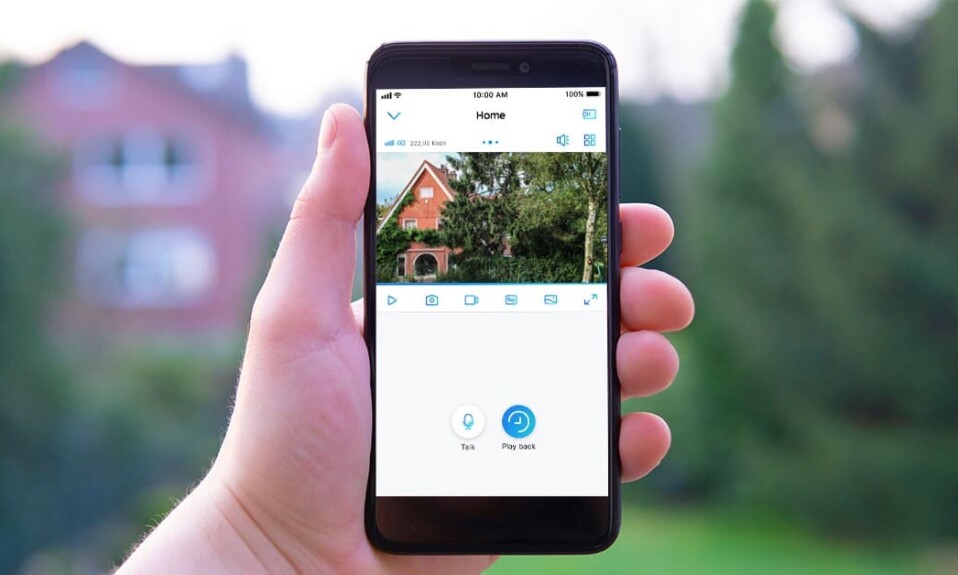
Solution 5: Enable The PIR sensor.
Sometimes the solution to your Reolink security camera not recording can be simpler than it seems. It could be as simple as enabling the recording and PIR features in the app.
If this is the case, all you need to do is enable these features to ensure your device records events seamlessly.
Follow these steps to activate the recording feature:
- Open the Reolink app.
- Go to the camera’s settings.
- Tap on “Camera Recording”.
- Then turn on the recording feature.
Here’s how to enable the PIR motion sensor:
- Open the Reolink app.
- Go to camera settings.
- Tap on the PIR motion sensor tab.
- And enable the PIR motion sensor.
Solution 6: Update Reolink Camera’s Firmware.
Updating your Reolink camera’s firmware is essential for resolving cloud recording problems. Firmware updates improve performance, fix known issues that may disrupt recording, and enhance the camera’s security.
Keeping your firmware up to date ensures your camera performs at its best
Here’s how to upgrade a battery-powered Reolink camera:
- Tap on the gear icon to go to the Device Settings page.
- Then go to the Upgrade page, and tap Upgrade Manually to upgrade the firmware for the camera.
Note: If you’ve enabled Auto Upgrade, the camera will upgrade to the latest firmware version automatically once it detects the version.
And here’s how to do it with non-battery powered cameras:
- Check the camera model and hardware version in the system information interface.
- Go to Download Center and find the firmware for your cameras/NVRs, if your current firmware isn’t the latest you’ll find a firmware build number larger than your current version available for download.
- Download the file and unzip it, using the Reolink Client, NVR monitor, or web browser to access the camera/NVR to upgrade it.
(Here’s a detailed guide that shows you how to upgrade a non-battery Reolink camera).
Solution 7: Reset The Device.
You can also consider performing a reset on your Reolink camera. This process can effectively resolve persistent bugs and internal errors that might be causing recording problems.
However, it’s essential to be aware that this method has a trade-off. Resetting your camera means that all your settings, preferences and recordings will be wiped from the device, requiring you to set up the camera anew.
You can take a look at this detailed guide from Reolink to reset your camera properly.
Conclusion.
If you have tried all the solutions mentioned above and none of them worked for you, I recommend that you contact customer support to get a personalized assistance.
You can also visit this article that talks about “How to Fix Reolink Camera Not Recording To The SD Card”.
- Does Ring Camera Work Without Subscription? - January 23, 2024
- How To Secure Ring Camera From Hackers? - January 15, 2024
- Ring Camera Not Picking Up Motion? – (Here’s The Solution). - January 11, 2024